Wednesday, September 3, 2008

Tapestry Tortilla Warmer


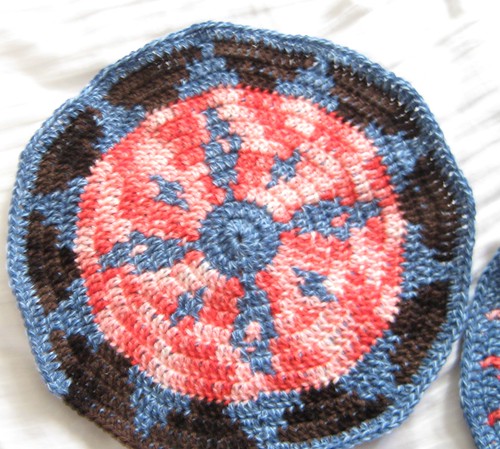
We eat a lot of tortillas in my house. We buy the uncooked kind, and cook them on the tortilla pan. I like to keep them warm, and usually use a towel to do so. I wanted to have something dedicated for tortillas, but I didn't really want to go buy a plastic container. I had several small amounts of yarn left, so I decided to make a tapestry crocheted felted tortilla warmer. I didn't have a set pattern in mind, but I kept going seeing where the yarn took me. The two sides are different. I used leftovers from 3 different balls of yarn from 3 different sources, they were all worsted weight, and luckily they all felted ok together. It was about 14" before felting and about 11" after felting. I'm still trying to decide if I'll need to line it or not, but I am pleased with how it turned out. The above photos are the prefelted shots. I haven't had a chance to try it out yet, but the kids think it makes a cool helmet.

Wednesday, August 13, 2008

Wash cloth for Baby


I know a lot of people that have had or are having babies this year- like over 20. I have been busy making baby gifts for them. Here is a simple pattern for a washcloth or burpcloth for baby. A wash cloth will get a bit more use than a hat, and it is distinctive from the other washcloths, so it can be easily recognized as Baby's cloth.

I used mercerized cotton, Butterfly Super 10, about 1/2 of a ball.
Size G hook.
Gauge: 18 st/ 4" and 17 rows/ 4"
Finished size about 9" square.

Chain 41
Row 1: in second ch from hook make dc, sc in next, *dc in next chain, sc in next; repeat from * across. Ch1, turn
Row 2: dc in first st, sc in next. *dc in next stitch, sc in next. Repeat from * across. (You are always putting a dc in a sc of the row below, and a sc in a dc of the row below).
Repeat row 2 until cloth is square, or desired size. Fasten off, weave in ends.

I have made a couple of these cloths now and I love how the color pools in different patterns.

Friday, July 11, 2008

My summer cardigan


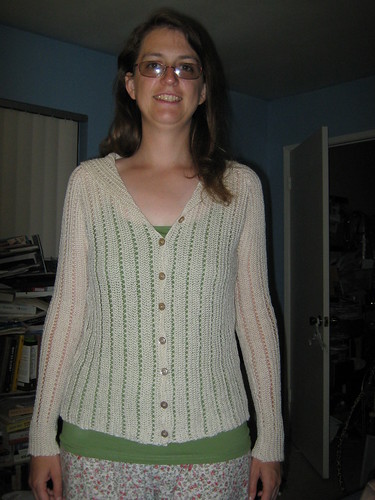
I finally finished my summer cardigan- and it's still summer! I started it the first weekend in May and finished it the first weekend in July. The pattern is Butterscotch Cardigan from the Spring 2008 Interweave Crochet magazine. It was a fairly straight-forward garment to crochet, each piece went by rather quickly. My stitch guage was a little off from what the pattern called for, but since it is worked vertically and I am taller than average, I didn't have to make any adjustments to the length of the garment. This was also my first real experience blocking and it went fairly well, although I might try a string or wires for the center front pieces next time. Seaming went by fairly quickly too- just match up a stitch on one side to a stitch on the other. Sewing in the sleeves was also wonderful, the striped pattern made it really easy to know what stitches to match up. I also loved working with yarn on a cone- each segment of the sweater was made from a single piece of yarn. The yarn is JaggerSpun Zephyr 50-50 Wool Silk lace-weight. It's a little finer than what was called for in the pattern, but I am pleased with the weight of the sweater.

Monday, June 23, 2008

Bamboo Baby Set


I recently made this bamboo baby set for my soon to be born nephew. I chose bamboo because it is soft, and because it will "grow" a bit with the kid, so maybe he'll get some more wear out of it. I was under a bit of a time crunch by the time the yarn arrived and when I wanted to get it mailed. I did this in a week. I was able to send it out to arrive in time for the baby shower. I tried swatching from a couple of books I have with baby sets, but nothing was really coming out very well. In addition, one of the books had a very sorry excuse for a gauge, showing only the stitches per 2 or 4 inches, but not giving the row gauge, nor finished measurements. So I improvised by taking a pair of baby shorts and matched the waist and rise, and added legs. For the sweater, I used measurements from a different pattern book, but created the pattern myself. I took good notes and may try to write up the pattern once I have some feedback on how it fits.

Thursday, June 19, 2008

One Blue Ribbon


I went to the County Fair yesterday and entered the "Nimble Fingers Quick Crochet" Contest. This year the pattern was more challenging than last year's, and we had 5 contestants this year. I am happy to say that I won a blue ribbon for coming in first in this year's contest. It was a close competition, the man who came in second was right behind me. The prize this year was some Blue Ribbon Strawberry Jam and a cookbook of the prize winning recipes from the 2007 county fair. I found my two entries on display, but neither of those won a ribbon. I didn't get a chance to look around the display floor too much, but I hope to take another look when we go back another day.

Wednesday, May 28, 2008

Infinitely finished


I've finished my take on the infinity wrap. I've blocked it once, and woven in all the ends. If I had time, I'd block it again, but alas, entry day for the fair is tomorrow. I was surprised at how much flattening happened when blocking it. If I were to do it again, I think I would stick with more regular color usage instead of my imposed pseudo variegated. I didn't change colors on the mesh part because I didn't want to have to weave in ends into the mesh. I'd also try it with only 2 colors. To recap: vintage size 30 cotton thread in 5 colors, and vintage size 11 steel hook.

Wednesday, May 14, 2008

A new shaped shell


Well, I finally finished it! This is a shirt that I made from "The Lady who Lunches Sheath" by Lily Chin in Couture Crochet Workshop. Her pattern is a beautiful dress and gloves. I was drawn to this pattern for several reasons, I liked the look of it, but more importantly it involved interesting increase and decrease sequences in the shell pattern stitch. I wanted to learn how to do this type of shaping. I had hoped to make the full dress, but when I was shopping for yarn, I couldn't find enough yarn in any one color to make a dress, but I found enough to make a top. This was done in Vickie Howell "Love" 6 skeins of purple and 1 of white, a bamboo silk blend. The pattern starts from the hem and works upward. It was an interesting challenge starting halfway through the pattern- how many stitches do I have after working through imaginary decreases, where do I put the stitch markers...After a few evenings of math and diagrams, I figured out the adjustments I needed to make. I pretty much followed the pattern from there, but I think I added a few extra rounds to lengthen it. I discovered an error in the shoulder shaping, figured out the problem, and was pleased to get a prompt response from the publisher about the errata. Once I finished the top and shoulder seams I had about half a skein of purple left over, so I decided to add a few rows to the bottom because it was a little on the short side for my tastes. I then trimmed it in white following the details in the pattern.

Thursday, April 10, 2008

Fun with Felting


I finally got around to making little swatches for felting. I made a sc square, a dc square, a dc circle, and a dc adult size hat. I should have known better and done this much earlier, but I am so glad I did it now. To make my sc square I chained 11, and starting with second chain from hook, sc in each stitch across to get a swatch 10 sc wide. I sc for 11 rows. Then I chained 16, and then made a dc swatch 10 stitches wide. I did 6 rows of dc. I chained 10 more stitches, then worked 10 dc in 3rd ch from hook. Closed w/ sl stitch in 1st dc. Increased 10 dc evenly for 3 more rounds for a total of 4 rounds and 40 stitches. Then I made my basic dc adult sized hat that goes to the bottom of the ears. I measured each piece and then threw it into the washing machine with a couple of other items to be felted.


Swatch .................Prefelted..... Felted..... % change


sc square 10 sc wide........ 2.75" ......... 2.25" ........... 20 %


............... 11 sc rows .........2.75" .......... 2.5" ............. 10 %


dc square 10 dc wide...... 2.75"........... 2.25" ........... 20 %


.................6 dc rows........ 2.75" .......... 2.25" ........... 20 %


dc circle 4 rounds .......... 4" ................ 3.125" ........ 20 %
The hat is a little hard to measure because it is still damp and drying, and I have to crush it to measure it. But rough measurements suggest it was 8" high when folded flat and 20" in circumference before felting. Post-felting it is about 6" high and 18" in circumference.

Wednesday, April 9, 2008

A Circular handbag


I've had this bag finished for awhile, but I haven't posted it. It is made from two circles in 2 colors. The circles are concentric- and closed at the end of each round. The ch stitches at beginning of each round do not count as a stitch. Then the circles are stitched together starting with just a single crochet seam, and increasing to about 5 stitches wide for the sides and handle and then decreasing back to the single crochet seam. To do the side seams, just sc into the side of the circle, and turn. Don't do a turning chain. Here's the recipe/pattern for this bag.
Gauge: not really important since it doesn't have to fit. But the first 4 rounds of this bag measured about 2.5 " in diameter.
Materials:
Worsted weight yarn in 2 colors about 100 yds each will be sufficient.
Hook to match yarn used. I used an H hook for this.
Stitch markers- 4.
Needle for weaving in ends.
Circles- Make 2. Make them any size you'd like. Just make them the same size! Do the increases evenly so that the circle stays flat.
Round 1: With green, chain 3, dc 10 in 3rd chain from hook. Close w/ slip stitch in top of 1st dc.
Round 2: Join black w/ sl stitch. Ch1, make 2 sc in each dc around. Close w/ sl stitch, and change to green.
Round 3: (green) Ch 2, Dc in same stitch as sl st; 2 dc in next stitch. *(1dc in next stitch, 2 dc in next stitch) repeat from * around. Close with sl stitch in top of 1st dc.
Round 4: With black, ch 1, sc in same st, 1 sc in next st, 2 sc in next st. *(1 sc in each of next 2 stitches, 2 sc in next st), repeat from * around. Close w/ sl st in 1st sc.
Round 5: With green, ch 2, dc in same stitch. 1 dc in each of next 2 stitches, 2 dc in next st. *(1 dc in each of next 3 stitches, 2 dc in next stitch.) Repeat from * around. Close w/ sl stitch in top of 1st dc.
Round 6: With black, ch 1, sc in same stitch. 1 sc in next 3 st, 2 sc in next st. *(1 sc in each of next 4 stitches, 2 sc in next st), repeat from * around. Close w/ sl st in 1st sc.
Round 7: With green, ch 2, dc in same stitch. 1 dc in each of next 4 stitches, 2 dc in next st. *(1 dc in each of next 5 stitches, 2 dc in next stitch.) Repeat from * around. Close w/ sl stitch in top of 1st dc.
Round 8: With black, ch 1, sc in same stitch. 1 sc in next 5 st, 2 sc in next st. *(1 sc in each of next 6 stitches, 2 sc in next st), repeat from * around. Close w/ sl st in 1st sc.
Round 9: With green, ch 2, dc in same stitch. 1 dc in each of next 6 stitches, 2 dc in next st. *(1 dc in each of next 7 stitches, 2 dc in next stitch.) Repeat from * around. Close w/ sl stitch in top of 1st dc.
Round 10: With black, ch 1, sc in same st. Sc in each stitch around, close w/ sl stitch.
Fasten off black and green yarns. Make 2nd circle as the first. Fasten off green only.
Joining and Handle
With wrong sides together, line up circles. Place markers symmetrically about bag at 10 st on either side of center bottom, where yarn is still attached, and at 15 stitches past each marker 1st placed. Put another way, the markers should be placed at 2, 4, 8, and 10 o'clock. (Note you can adjust where the markers are placed to suit the opening you want for the top of the bag. Just be sure to place them symmetrically about the vertical axis (12-6 o'clock) of the bag.
Row 1: Ch1. Sc through both circles in each stitch up to 1st marker.
Row 2: Sc in stitch on front circle, sc in corresponding stitch on 2nd circle. Turn.
Row 3: Sc in last stitch made. Sc in next stitch. Sc in next stitch on bag. Turn.
Row 4: Sc in last stitch made. Sc in next 2 stitches. Sc in next stitch on bag. Turn.
Row 5: Sc in last stitch made. Sc in next 3 stitches. Sc in next stitch on bag. Turn.
Row 6: Sc in last stitch made. Sc in next 4 stitches. Sc in next stitch on bag. Turn.
Row 7: Sc in next 5 stitches. Sc in next stitch on bag. Turn.
Repeat row 7 until you reach marker at 10 o'clock position.
Row 8: Ch1 and sc in each stitch across. Turn.
Repeat Row 8 until handle is approximately 2" longer than arc of bag if you were to hold handle snug against bag to measure.
Row 9: At next marker (2 o'clock position) Sc in next stitch on bag, sc in each stitch across. Sc in next stitch on bag. Turn
Row 10: Sc in next 5 stitches, sc in next stitch on bag. Turn.
Repeat row 10 until you reach 5 stitches before next marker (4 o'clock position).
Row 11: Sc in next 2 stitches, sc 2 together, sc in next stitch, sc in next stitch on bag. Turn.
Row 12: Sc in next stitch, sc 2 together, sc in next stitch, sc in next stitch on bag. Turn.
Row 13: Sc in next stitch, sc 2 together, sc in next stitch on bag. Turn.
Row 14: Sc 2 together, sc in next stitch on bag. Turn.
Row 15: Sc in next stitch on bag on each side of bag.
Row 16: Through both sides, sc in next stitch on bag until you reach center bottom, close w/ sl stitch in 1st sc. Fasten off and weave in ends.
copyright 2008 Karla McCalmont.
Thursday, April 3, 2008

Birthday fun


I recently celebrated my birthday and had lots of fun with family and friends. I have to tell you though that I received the best birthday cake ever from my son. He made this cake, with frosting and candles all by himself. He came out of his room and gave me the cake. We had so much fun eating it and eating it and eating it. Then the next day, it was so sweet, he came out of his room singing "Happy birthday to you. Happy birthday to you. Happy birthday to you. Happy birthday to you." and handed me the cake again. I wish I could have recorded it because it was so sweet and precious.


I also received some llama yarn from a local farm. I am excited to work with it, but I am not sure yet what I will make. The yarn is minimally processed, so it still has bits of hay in it. So I'll need to pick them out as I go.

I almost forgot- I also received some wonderful handmade crochet stitch markers from my niece. I haven't done much crocheting since my birthday, but I am excited to use them. I'll have to use them on projects I keep in my bedroom away from curious little hands though. Otherwise they'll pull them out to play with, and I won't know where they were marking.